Growing Grapes
Site Considerations
Grapes require a lot of sun and heat and are best planted on a south facing slope. They also prefer well-drained, sandy, or gravelly soils because they warm up faster and retain more heat. If your only choice is to plant in heavy soil, choose early ripening varieties and plant in mounded rows or raised beds.
To maximize your soil’s heat retention ability, remove vegetation, mulch with dark gravel (if using mulch), and plant on mounds 4“-6“ high and 3′ wide. Dark colored landscape fabric can also help warm your soil up and keep weeds down but needs to be removed in late fall to prevent overwintering rodent damage. Organic mulches and groundcovers are unsuitable because they cool the soil. If you have rocky ground, piling the rocks under the plants will help hold the heat throughout the growing season. Grapevines will not compete with heavy weed pressure in their early years.
Only low rates of fertilizer are needed after the first year. An annual application of a micronutrient mix such as Azomite is recommended to replace what is quickly expended in the soil due to vigorous growth. Grapes grow best with a soil pH of 6.8 or higher. Due to the acidic soils in Western Washington, an annual application of lime is also recommended. Calpril, a liming product made mostly from calcium carbonate (or limestone), can safely be applied annually to “sweeten” (increase pH) your soil while also providing calcium, an important nutrient for fruit production. If you have further pH concerns, take a soil test to determine your needs. Most sites do not need irrigation after the first year. If terminals (tips of shoots) are actively growing, the plants do not need water.


Pruning and Training

Single Curtain System
One of the easiest training systems for table grapes is the Single Curtain or High Cordon System. The end goal is to have a strong centered trunk, two horizontal arms called cordons trained along a load bearing wire, and a curtain of fruiting shoots growing down from spurs along the cordons. These fruiting shoots will be thinned to allow for optimal light exposure and airflow around the grape clusters. For this system, you will need to install a trellis with sturdy end posts, 10-gauge wire hung 6′ high, and t-posts supporting the wire in between.

Training a New Vine
- If you are starting with a new plant, remove all but the strongest/straightest shoot and cut back to 2-4 buds in the first dormant season (mid-January or February ideally). This will become the foundation of your trunk. Tie a string from the base of the plant to the load wire or use a stake taller than the load wire to train the vine up. The next growing season, select the strongest shoot to continue to train up the string/stake. Remove all other shoots and remove flower clusters throughout the season.
- When the shoot reaches the wire, prune it back to 3″-4″ below the wire. This will encourage lateral growth. Keep two lateral branches growing from the top of the shoot. Wrap these branches loosely around the wire and tie to attach. These are now your cordons. Continue to remove flower clusters throughout the season.
Continuing the System
- In the next dormant season, prune the lateral growth of the cordons back to your desired length. If vines are spaced 8-12 feet apart, each cordon should be maintained at a 4-6-foot length to fill in the space. As new growth emerges from the cordons, leave one cane every 6″-12″. Cut these canes back to 2-4 buds. These are now your spurs.
- Buds from the spurs will now grow into the curtain of fruiting shoots. Thin these shoots in June (or as soon as flower clusters start to form) to 3-5 shoots per foot. Ensure these shoots are growing downward and allow one cluster of fruit per cane this year. If the cordons are injured and need replacing, train a well-position shoot from the trunk, grow the new shoot for a year, and remove the old cordon the next year.
Low Cordon System
This single curtain system works great for most table grapes; because they are so vigorous, training them downward slows growth and focuses energy on the fruit. Most wine grapes are trained in a very similar way called the Low Cordon System. In this system, cordons are instead trained along a low wire 24″-30″ high, with upright spurs. The shoots are trained upright and woven though catch wires to hold them in position. Regardless of the system, the training principles remain the same: establish a strong foundation, train for healthy one-year-old wood, and thin fruiting shoots for proper light and air flow for quality fruit.

Cane Pruning
Both above systems are spur pruning systems relying on spurs along a cordon to generate fruiting shoots. Cane pruning systems do not retain cordons year after year. Instead, during dormant pruning each year, two canes are selected close to the top of the trunk (also called the head of the vine) and tied laterally to the wires. Two additional canes are left and pruned back to spurs. All other growth is removed, and the two lateral canes will produce fruitful shoots in the next growing season. The following dormant season, shoots from the two spurs (called renewal spurs) will be used to replace the old canes.
Cane pruning systems remove 80-90% of the vine each year and promote more vegetative growth. Spur pruning systems are often more productive, but old cordons can be more susceptible to disease and injury. Whichever system you choose, the fundamentals of training new vines and canopy management remain the same.

Canopy Management
- Shoot growth every spring will push hard, and, in most years, gravity will prevail and force the canes to droop towards the ground. If needed, prune vines to 12″ above the ground in July or early August to prevent damage.
- Shoot thinning is very important to reduce foliage and increase air circulation and light penetration in the canopy. There should be no more than 3-5 shoots per foot of cordon.
- Reduce the number of clusters on your vines pre-bloom. Leaving too many clusters on your plants will delay the ripening times in all varieties. Start by leaving 1 cluster per cane and see when the ripening time occurs- this will give you guidance in future years on what is an appropriate cluster set per plant for your site.
- Leaf stripping is done to maximize sun exposure on the grapes. The warmer the cluster the earlier the fruit ripens. Strip all leaves that are shading the grape clusters as soon after fruit set as possible. It will seem like a lot of leaves, remember the vines will grow more.
- A few weeks after bloom, after fruit set, and again at the beginning of veraison (berry color change), untangle canes and fruit clusters and position shoots properly on the trellis. This exercise will give you beautiful clusters during harvest.
- In cool years, rigging a high tunnel with hoops and greenhouse poly over your grape trellises can hasten ripening and prevent rain from splitting the ripening fruit.

pests and diseases
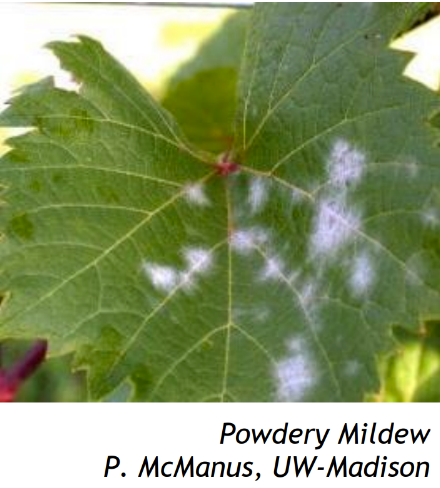
Powdery Mildew
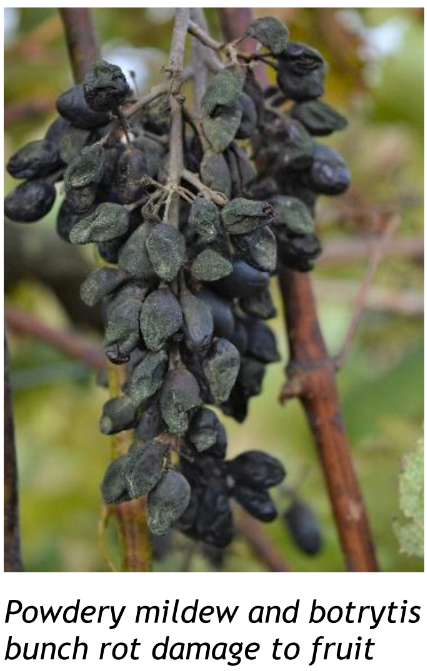
Powdery Mildew & Botrytis
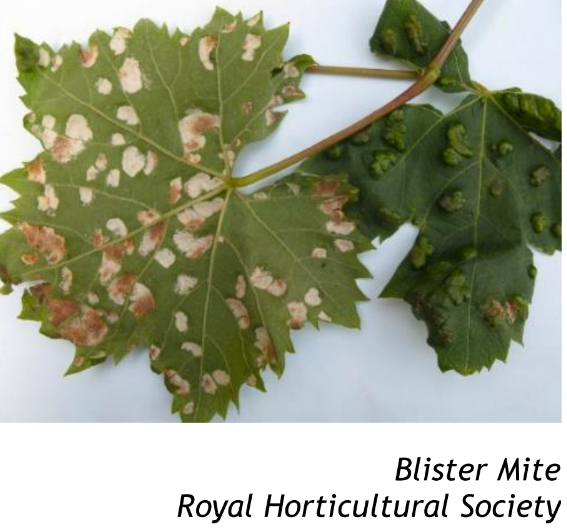
Blister Mite
Powdery Mildew and Botrytis Bunch Rot
Powdery mildew and botrytis bunch rot are two fungal diseases that can affect young shoots, leaves, and fruit. Both spores are wind dispersed; botrytis develops in wet and humid conditions, and powdery mildew can develop in wet or dry. Shoots and leaves infected with botrytis develop brown, water-soaked areas in spring. Infected clusters will begin to rot and show brown spots in late summer and autumn, often with grapes in the center of the cluster rotting first. Powdery mildew emerges in grey or white patches on leaves and fruit and in dark feathery patches on canes. The fruit can turn brownish and russeted. Both are best prevented by avoiding overhead irrigation and proper canopy management to allow sun exposure and airflow. For more intense infections, fungicides may be needed. Refer to pnwhandbooks.org for more information.
Blister Mite
Blister mite is a common pest in some grape varieties but does little damage to the plant. Raised blisters begin to appear on the top of the leaves in Spring. When the leaf is flipped over, round white colonies of mites will have formed causing the blisters. These colonies turn brown later in the season, and the mites leave to overwinter in the buds. Severely infected leaves can be removed and disposed of. Because leaf stripping is good practice for grapes anyways, this does not have a negative impact on the plant. For more intense infestations that are affecting production, pesticides may be needed. Refer to pnwhandbooks.org for more information.
Year in Review
Winter
- Dormant season pruning January-February
Spring
- Shoot positioning
- Fertilize and lime
- Monitor for pest and disease
Summer
- Shoot thinning in June
- Shoot positioning
- Leaf stripping after fruit set
- Monitor for pest and disease
Fall
- Harvest! Best quality is following 2-3 days no rain.
- Don’t leave ripe grapes on vine as the quality drops quickly.
